In this project, I built a C++ program that can process video footage of planets moving through a telescope and then auto-detect the planet, crop to the region of interest (ROI), align them to the selected template, and stack them to provide a better signal-to-noise ratio.
This is a standard technique in astrophotography, but doing this with the help of more fundamental libraries like OpenCV and OpenMP has taught me a lot about how we represent and process image data efficiently in the modern computer.
Lucky Imaging
First of all, I would like to introduce readers to the technique we use in astrophotography to provide a clearer context, along with the choices we will make later in the project and why they work under certain assumptions.
Normally, nighttime photography (where astrophotography generally takes place) is quite difficult since we do not have much light. Although there are many photography techniques out there to help mitigate this challenge, we generally face a problem with noise.
Underlying Mathematics
This is also the case when we capture photos with a telescope, you can think of it as a lens with a very high zoom factor. Still, the light from planets or celestial objects coming from hundreds of millions of kilometers away is very subtle. Ideally, the signal in terms of the number of photons that fall on the camera sensor follows the Poisson Distribution, and this is where statistics come in.
Roughly speaking, the camera interprets the value in each pixel as the amount of photons, or the signal, that is arriving. You can view each capture of the same photo as a representation of the mean of the actual pixel value that each pixel should have.
Recall from statistics class that with more and more samples, you can predict the mean with greater confidence. Night photography contains a lot of noise, which is roughly represented by the standard deviation of the Poisson Distribution.
In daytime photography, we already have less noise, meaning the mean value we are trying to predict is already accurate (low standard error). However, at night this is not the case, which is why we capture multiple images. By stacking them together and finding the mean or median of each pixel, the resulting image is noticeably less noisy.
Planetary Photography
Generally, nighttime photography involves opening the camera sensor for a longer time to gather more light. Since multiple photos are needed for stacking, this might even take hours of photography to get a single image.
However, this is not the case for planets. First, because the telescope already helps us gather light, if we keep the sensor open for too long, we end up with a bright circle with no details. On the other hand, shorter exposure allows us to capture more detail in the planet itself, though with less background detail such as Jupiter’s moons.
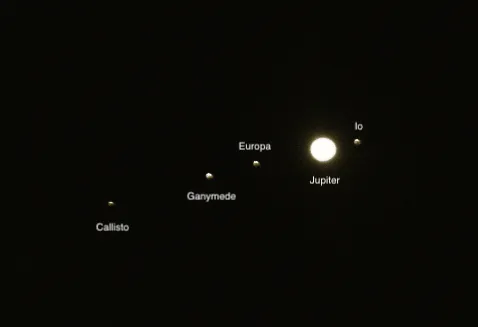
When opening the camera sensor for too long, we can image subtle objects like Jupiter’s moons, but we will lose details on Jupiter’s surface. Image credit: https://skyandtelescope.org/online-gallery/moons-of-jupiter-annotated/
Therefore, we usually go with lower exposure, similar to everyday photography. To gather as many frames as possible for stacking, we can film a video of planets moving across the field.
The important caveat here is that you cannot simply get millions of images by filming for an hour and hope you will getbetter results, since planets do rotate around themselves. Photos captured over too broad a period will be blurry when stacked, like when you move your hand quickly in front of a camera.
If done correctly, this technique is called lucky imaging, you capture multiple instances of the same object to try to overcome atmospheric turbulence and other factors that generate noise.
Video Processing Workflow
Now that we have an overview of what is going on, let’s see how we can approach this as a coding problem. Generally, the workflow should be as follows. This is the approach used in famous software like PIPP and AutoStakkert!.
The reason I decided to build my own was also because these software packages are not available on macOS. Back in the day when I was an astrophile, I still used Windows, so there was no problem.
This is the flowchart depicting the general workflow of most planetary image processing software. Some cannot perform every step and require the integration of multiple ones.
flowchart TD
    A[🎥 Input Video] --> B[🖼️ Convert Video to<br/>Array of Images]
    B --> C[✂️ Crop Each Image<br/>Square Centered on Planet]
    C --> D[🔍 Quality Check<br/>Contrast • Sharpness • SNR]
    D --> E[⭐ Select Template Image]
    E --> F[🎯 Subpixel Alignment<br/>Align All Images to Template]
    F --> G[📚 Stack Images]
    G --> H[🌌 Final Processed Image]

    %% Styling for better visual appearance
    classDef inputOutput fill:#e1f5fe,stroke:#01579b,stroke-width:2px,color:#000
    classDef processing fill:#f3e5f5,stroke:#4a148c,stroke-width:2px,color:#000
    classDef qualityCheck fill:#fff3e0,stroke:#e65100,stroke-width:2px,color:#000
    classDef finalResult fill:#e8f5e8,stroke:#1b5e20,stroke-width:2px,color:#000

    class A,B inputOutput
    class C,F,G processing
    class D,E qualityCheck
    class H finalResult
Extracting ROI from Videos
In order to figure out the steps required, it is easier to think backward. Generally, stacking only works if we assume that each pixel corresponds to the same signal that we are trying to capture, so we need to align all images first.
In order for the alignment algorithm to really focus on the object, we first need to identify the ROI, which should essentially be a square crop around the circular planet with some padding (mainly for aesthetic purposes).
Therefore, our first step is to get that ROI. First, we make sure to process the video as an array of images. Following that, we detect the ROI in each image and crop around that. Simple, right?
There are several methods for doing so. The one I prefer is to get the binary representation of the image. Yes, only black and white. Since we have a dark background, it is easy to establish some value in the threshold from 0 to 255 where all parts of the planet are in white, and then the remaining is just the dark background.
For extensibility, we use adaptive thresholding instead of absolute values. OpenCV handles this really well, so we don’t really need to worry about it.
Also, don’t forget to convert the image to grayscale beforehand since normal images have three color channels. The grayscale one will be useful for future calculations as well.
Aligning Images
Now that we have images that are easy to align, let’s think about which image we are aligning the rest to. This image will be referred to as the template.
When selecting a template, we can consider a few things. Generally, these are contrast, sharpness, and possibly signal-to-noise ratio, though that should be quite invariant. Personally, I found sharpness to play the highest factor, so when calculating the quality score, I weight sharpness the most.
Now that the image is quite aligned already after cropping, we only need to do subpixel alignment. That is just a buzzword; what I mean is to fine-tune the alignment furthermore.
The technique that I decided to use here is called phase correlation. First, we perform Discrete Fourier Transformation on each image.
It is quite well-known that the technique provides us with information on how signals (like sine and cosine waves) differ from the original, which we then translate accordingly.
Stacking Images
Perfect! Now we have the images that are ready to be stacked. Are there any other challenges here? Unfortunately yes, we have something more to consider.
There are some potential edge cases here. What if the image you captured has extra noise that came from an external source (like a plane passing by)? This simply violates the assumption that the noise follows the Poisson Distribution. Or more simply, the mean is definitely affected if we have some images that are extremely bright.
To address this issue, we use a technique called sigma clipping. We establish some threshold, for example, if the value in a pixel deviates too much from the mean, i.e., 2 sigma or 3 sigma, we simply clip it.
By clipping, there are several methods of clipping. You may clip that to the maximum allowed values (basically preventing outliers) or fall back to the median, which is what I do here. The figure below demonstrates how stacking helps improve the image quality.
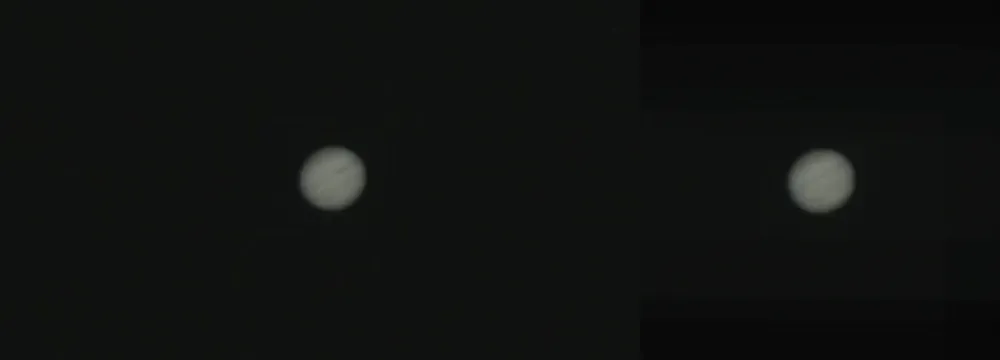
Having more images can help improve the quality and reduce noise in the images. I never said it only improves image signal; it also reduces background noise, which makes the background darker! These footages were taken around October 2022 back in my home in Thailand.
To get the most details, most images captured are quite small. They may appear noisy here on both sides, but it’s actually just a scaling issue. Aside from that, the image shown on the right is the result of stacking only 10 images! Generally, we have videos of a minute long. Multiply by frame rate to see how many images we have.
Optimizing the Computation
Since this is a coding project after all, I want to share some technical details that I learned along the way and how they are useful. I found the use of OpenMP to make the process faster by 3.5 times! This is the most successful attempt at parallel computation I have achieved so far in all my projects.
What to Parallelize?
When thinking of parallelizing things, I usually think of where things would benefit from doing so. The good starting point is identifying where we use for loops, which are well-known for performing sequential tasks.
In my program, there are potentials for loops including the image alignment where I go through each image to first calculate the quality during template selection and when I am shifting the rest of the images to align with my template.
Basically, I can use the following directives (with some specifications on shared resources to do the thing):
#pragma openmp parallel for // ...This basically means we are parallelizing over the images (we are processing each image in a different thread). I also have the array storing all images, so write access to each can cause race condition. We use the following directive to handle that:
#pragma omp critical
{
    // Code requiring exclusive access
}
This ensures only one thread executes this code block at any moment.
How to Parallelize the Stacking Process?
When stacking images, we are actually iterating over the pixels in each channel to compute the mean value of each pixel (as in our method). Therefore, it doesn’t make sense to parallelize over each image since we are not going through each image one by one; we need to perform arithmetic operations on each, which require one another.
To (smartly) overcome this, I parallelize the loop over the pixels. This means each pixel mean is calculated in each thread, which makes sense since they are independent from each other, and this is where I believe what makes the code run way faster compared to sequential processing. For instance, this is written as follows:
#pragma omp parallel for collapse(2)
for (int i = 0; i < N; ++i) {
    for (int j = 0; j < M; ++j) {
        // Work to be done
    }
}
The collapse(2) clause tells OpenMP and compilers to treat i and j as a single iteration space. This can only be
done if there are no statements between the two loops.
Closing Thoughts
And that concludes everything I want to share about this project. After all, it is about learning new languages and tools by building something related to the work that you already know well.
It is easy to verify whether my algorithms are running correctly by seeing what images they produce and checking to see if they are odd, so I can focus my brain on learning C++ and OpenMP instead of verifying the correctness of the stuff.
In this period, where I find many people building things to impress others or creating tools that maximize the portfolio and recruiter-appeal, the element of building something you truly care about and generally for yourself is kinda disappearing.
To all who are reading to this point, if you have some time, it is always good and refreshing to work on a project that you really care about.
Thanks for reading, you can explore my posts if you want to learn more about me or my work.